Google+

Saturday, November 19, 2011

Surface Area III...Defensive Options

First, I have added a poll question to the right bar which I'd like to collect everyone's response.  Please let me know what you think.
The Player's Positions
Yellow: On the Defensive
It may seem Yellow has no actions when on the defensive, but there are things Yellow can do to adjust the mental state of their opponents.  This allows Yellow to control their opponent's actions to a degree.  However, first Yellow must come to terms with a given fact:
Yellow Will Lose Territory.


Inevitable Loss of Territory
Unless Yellow has an unusually large number of units compared to their opponents, it is not possible for Yellow to defend every space.  The following chart lists each color, their number of units, and their 'Army Density': how many troops may be spread evenly along each location adjacent to an enemy.

Player Spaces Surface Area Army Density
Blue 15 5 3
Green 12 7 1 (5 Leftover)
Red 9 4 2 (1 Leftover)
Yellow 14 10 1 (4 Leftover)

Wednesday, November 2, 2011

Surface Area II...Plan of Attack

When dealing with Irregularly Shaped boards, it is necessary to consider the areas to attack and how to defend against them.
A Game "In Progress"
Here we have basic Risk style game in progress, using the map of the US as the board.  The states occupied by a player all show the same color.


   Blue = 15 Armies
 Green = 12 Armies
Yellow = 14 Armies
   Red = 9 Armies


For this example we will have the following rules:
  • Every state provides one army per turn, which may be placed in any state(s) the player controls,
  • Every state may only attack states adjacent to them,
  • A player may not 'Blitz' -- launch an attack from a recently captured territory (Example: I capture Colorado this turn, I may not then attack from Colorado this turn, but may do so next turn).
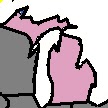
Michigan in Pink
It's all one state
We will look at various sides to determine the best possible moves and how the irregular board affects their decision making.


NOTE: Michigan is oddly shaped and in the main image appears as if it is two separate locations.  However, it is important to realize this location is all one state.
Yellow: On the Offensive

Yellow appears to be in the worst possible position militarily.  Yellow has charged up the center and now occupies 14 regions.  Normally in a game where a player creates a bulge like this it is not a good thing.  Despite receiving 14 armies, Yellow can be attacked into 10 different locations.  Trying to defend all of these locations is nigh impossible, especially considering they may face the might of all three opposing powers.


Yellow needs to consolidate it's power.  The answer is to attack.  The question is "Where?"
Positive Attacks
Positive Attacks
Since the concept is to reduce Yellow's surface area, Yellow should consider attacks into the locations indicated on the right.  The two attacks against Red in the upper left should be made first as they will decrease Yellow's overall surface area from 10 to 9.


When on the offensive, any Reduction in Surface area is a good thing.  Therefore, these attacks are a Positive Attack: an attack the player should definitely make!  The order of the attacks is important.  The northernmost attack should be made first as, by itself, it is a Neutral attack. 


Negative Attacks
Increase Surface Area
Negative Attacks
Attacking any of the states shown in the diagram below will result in Yellow increasing the surface area.  This will result in Yellow spreading its troops even thinner in order to hold on to the state.  Even if Yellow were to win ever battle there would be a net increase in surface area.  Unless a player has overwhelming superiority in force, or there are no other options remaining, negative attacks should be avoided.


Neutral Attack
Neutral Attacks
The attack into Missouri will result in a neither an increase nor a decrease in surface area.  As such, the player may decide to make the attack or choose to wait it out.  Such territories are considered 'Neutral Attacks', as they provide no tangible benefit, but carry no additional risk.


Some games, such as Risk, give a player a bonus if capture a territory.  In the case of Risk, if a player captures one territory during their turn they receive a card.  When matched with other cards the player has collected, the player may trade them in for additional armies.  For many such games, these additional armies become critical to winning the game.  This can shift a Neutral Attack to a Positive Attack.  However, if the player has already captured a territory somewhere else, the benefit (the card) has already been earned.  This once again relegates the attack to being 'Neutral'.


Neutral Attacks should be undertaken only if the player has sufficient force.  It can also be used as a bargaining chip for negotiations with other players.


Conditional Attacks
Conditional Attacks
The two attacks on Red's southern states (Arizona and Utah) normally would yield negative results.  Even if both states were won together they would result in a net increase in surface area.  However, if the two attacks above it are successful (see Positive Attacks above), then winning both states would result in no overall net increase in surface area, but the player would control more states resulting in more armies.


This makes these attacks 'Conditional Attacks'.  Making these attacks is dependent on the outcome of some other attack(s).  They are also dependent upon having sufficient forces available for both attacks to be successful.


Next Article
The next article will discuss what Yellow should do if it is not its turn and is forced to act defensively.

Negotiations

This article will cover an important part of many player games: negotiation.

Importance of Negotiations
In games which involve more than two players, the possibility of negotiations present itself.  Negotiations can become critical to success.  By coordinating efforts, two (or more) people can combine forces against another player.  The effect is to either:

  1. Increase the number of units brought to bear against the target player,
  2. Open up a new front the opponent must deal with, or
  3. Secure a player's flanks from attack

Achieving successful negotiations is common, but several elements must be considered.

Element of Trust
Both player's need to exhibit some trust.  Normally when negotiating, both players must put themselves at risk.  The risk may be greater for one player than the other, but the element of risk is there.  To that end, both players must have a degree of trust.  This means both players must have a reason to trust each other.
Sample Diagram
Looking at the diagram above, agreements could be reached between almost all players, except Red and Yellow.    Red and Yellow are in direct conflict.  In order for Red to expand its territory, it must intrude